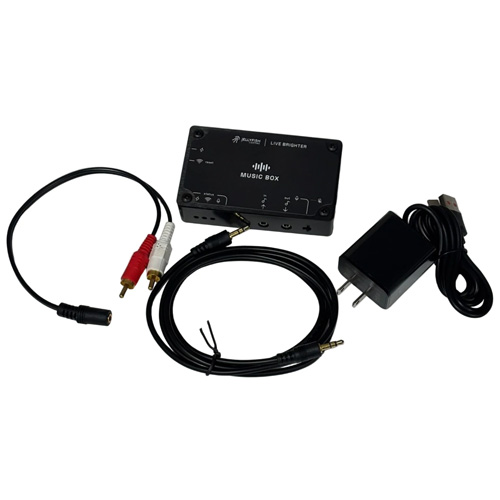
Jellyfish Lighting Music Box
Bring your lighting to life with music! The Jellyfish Lighting Music Box syncs your Jellyfish Lighting controller with your music source over Wi-Fi, creating dynamic, music-driven lighting experiences.
Features:
Quick Wi-Fi Setup: Easily connects to the same network as your Jellyfish Lighting controller.
Flexible Audio Options: Includes a 3.5mm audio input and output to pass your audio signal from your source to an amplifier and speakers.
Mic Mode Toggle: Simply place the Music Box near a Bluetooth or other speaker to capture audio without direct wiring.
Power & Connectivity: USB-C power input with included power brick.
INCLUDES: a 3.5mm audio cable and RCA to 3.5mm adapter. Additional cables may be needed depending on your home audio system.
Applications:
Perfect for backyard patios, holiday displays, live entertainment, dance clubs, bars, restaurants, and any setting where music-driven lighting can enhance the experience.
After years of anticipation, Jellyfish Lighting has developed a professional-grade solution that seamlessly integrates audio with lighting for a fully immersive atmosphere.
Requires – Jellyfish lighting system with the JellyFish Light Cloud App
Connection Examples
Scenario 1 — Speaker to Music Box (Microphone)
Make sure the Music Box is next to the audio source with the microphone switched on and the speaker volume loud enough for it to detect, usually around 25% or higher.

Scenario 2 — Smart Speaker With AUX Output (Alexa / Google)
- Make sure the smart speaker has a 3.5mm headphone-style audio output jack.
- Connect the smart speaker 3.5mm OUT to the Music Box 3.5mm INPUT using the included 3.5mm stereo cable (AUX cord).
If the smart speaker mutes when the cable is plugged in:
- Pair / group a second speaker within the speaker’s app (Alexa/Google) for audible playback.
- Start playback and confirm the Music Box is receiving the audio.

Scenario 3 — Streaming Device Inline to Amplifier (or Powered Speakers)
Option 1: Streaming device → Music Box → Amplifier → Passive speakers
- Place the Music Box near your audio equipment (and on the same Wi-Fi network as the JellyFish controller).
- Connect the streaming device analog audio OUT to the Music Box 3.5mm INPUT using the 3.5mm-to-3.5mm stereo cable.
- Connect the Music Box 3.5mm OUTPUT to the amplifier LINE/AUX input:
- If the amp has RCA inputs, use the 3.5mm-to-RCA adapter.
- If the amp has a 3.5mm input, use a 3.5mm stereo cable.
- Connect the amplifier speaker outputs to the passive speakers using speaker wire (typically 4-conductor for stereo).
- Play music and confirm the amplifier/speakers are working normally.
Option 2: Streaming device → Music Box → Powered speakers (no amplifier)
- Connect the streaming device analog OUT to the Music Box 3.5mm INPUT (3.5mm stereo cable).
- Connect the Music Box 3.5mm OUTPUT to the powered speakers LINE IN (RCA L/R) using the 3.5mm-to-RCA adapter (then RCA cable to speakers).
- Set the powered speaker input to LINE/AUX and start playback.

Scenario 4 — AVR with Simultaneous Speaker Output + Line Output
- Confirm the AVR supports simultaneous speakers + line-level output (Zone 2 Out / Record Out / Line Out).
- Connect the AVR Zone 2 / Record / Line OUT (RCA L/R) to the Music Box 3.5mm INPUT using:
- RCA cable from AVR, then RCA-to-3.5mm adapter into the Music Box.
- Keep your speakers connected normally to the AVR’s speaker terminals (speaker wire).
- In the AVR audio settings, set the output format to PCM / Stereo if available.
- Start playback and verify speakers play normally while the Music Box is receiving the signal.

Scenario 5 — TV Audio to Music Box
Option 1: TV with analog audio out
- Find the TV’s analog audio output (3.5mm headphone/line out or RCA L/R out).
- Connect the TV analog OUT to the Music Box 3.5mm INPUT:
- 3.5mm → 3.5mm stereo cable, or
- RCA L/R → RCA-to-3.5mm adapter → Music Box.
- In TV audio settings:
- Set audio format to PCM / Stereo
- Enable TV speakers + audio out (if the TV provides that option).
- Play audio and verify the TV still plays sound while the Music Box receives signal.
Option 2: TV without analog out (using a DAC)
- Connect the TV digital audio OUT to a Digital-to-Analog Converter (DAC):
- Optical (Toslink) or HDMI ARC (depending on your DAC and TV).
- From the DAC RCA L/R output, connect to the Music Box 3.5mm INPUT using an RCA-to-3.5mm adapter.
- In TV audio settings:
- Set audio format to PCM / Stereo
- Verify the TV’s audio output is active for the selected port (Optical/ARC).
- Play audio and confirm the DAC is producing analog audio and the Music Box is receiving it.

Scenario 6 — Speaker-Level to Line-Level Converter
- Turn the amplifier off before wiring.
- Locate the amplifier speaker outputs (Left +/–, Right +/–).
- Connect the amplifier speaker outputs to the speaker-level INPUT of the speaker-to-line converter (4-conductor speaker wire).
- Connect the converter’s pass-through speaker outputs to the passive speakers (speaker wire).
- Connect the converter’s RCA line-level OUT to the Music Box 3.5mm INPUT using an RCA-to-3.5mm adapter.
- Power on the amplifier and play audio at a moderate volume.
- If the converter has level controls, adjust to avoid distortion/clipping.

Quick universal tips:
- Do not connect speaker-level outputs directly to the Music Box.
- Music Box Bluetooth is only for Wi-Fi setup, not for audio streaming.
- For TV/AVR, set audio format to PCM/Stereo when possible.