JellyFish Lighting with Amazon Alexa
JellyFish Lighting is now compatible with Amazon Alexa! In this article we will show you how to install and integrate your JellyFish Lighting system with Amazon Alexa and then also how to use the system in various ways.
Installing Alexa with JellyFish Lights
- Make sure you have installed the Alexa app as well as the JellyFish Cloud App (JF Cloud).
- Make sure you have set up an Alexa (Amazon) account and answer all the setup questions on the Alexa app
- Update the JellyFish Cloud App to the latest version
- Make sure you have set up the JellyFish Cloud App by creating an account and adding your controller(s) to the account
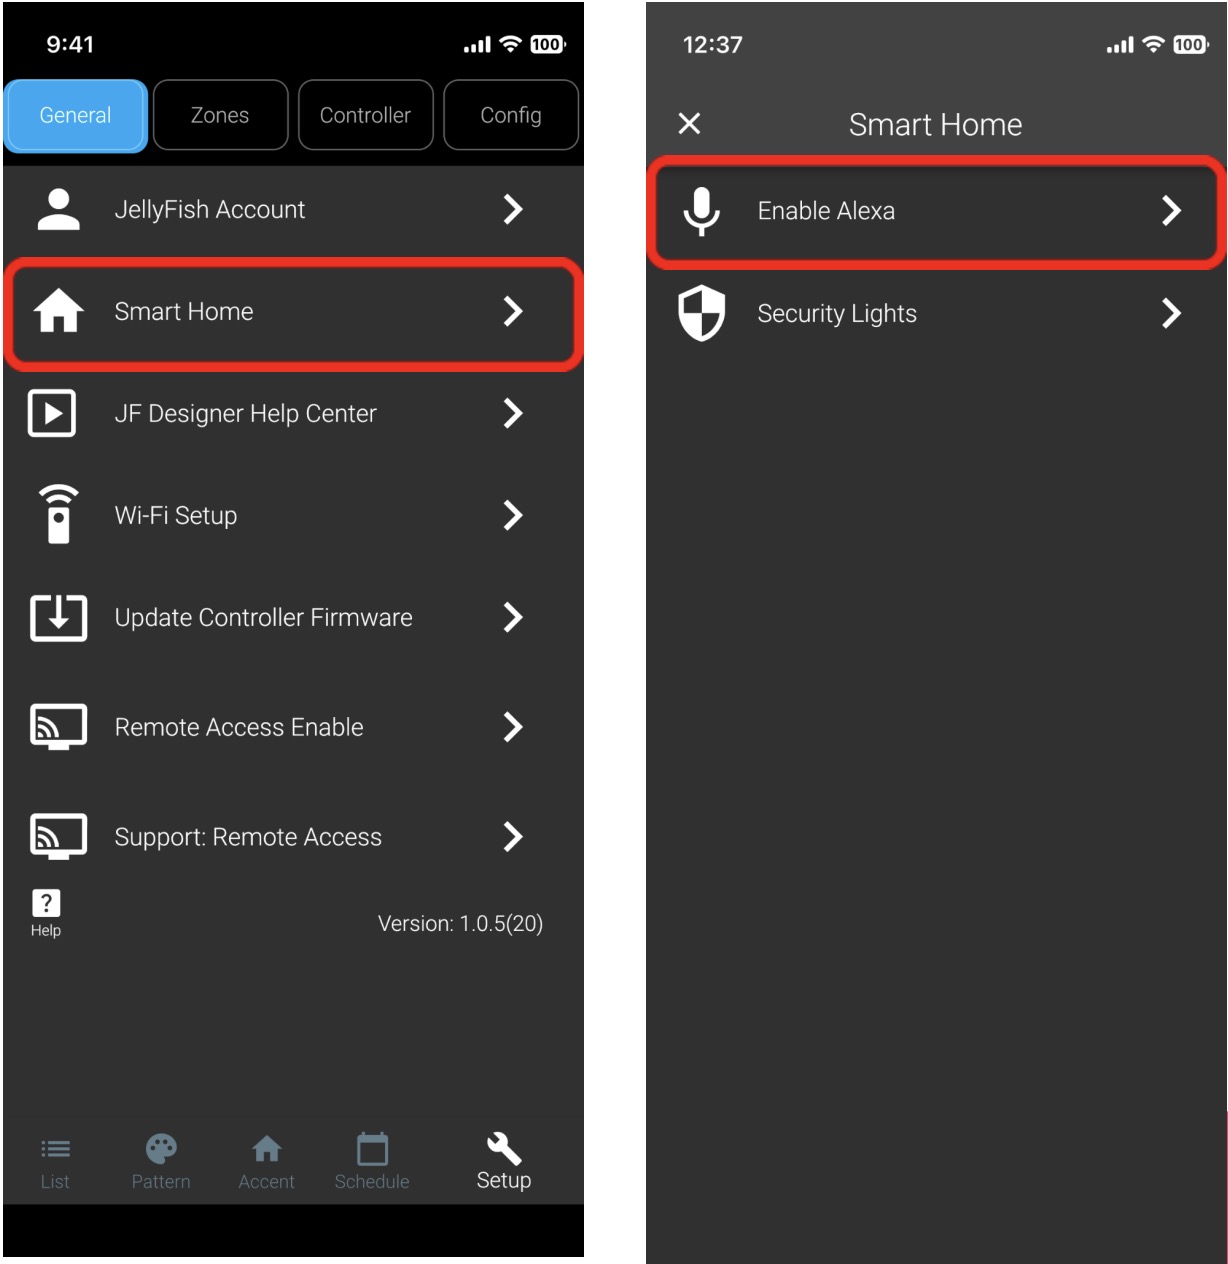
- Within the JellyFish Cloud App, go to the Setup page and select Smart Home
Note: The Smart Home capability is only available when using the JellyFish Cloud App. - From the Smart Home screen, Select “Enable Alexa”
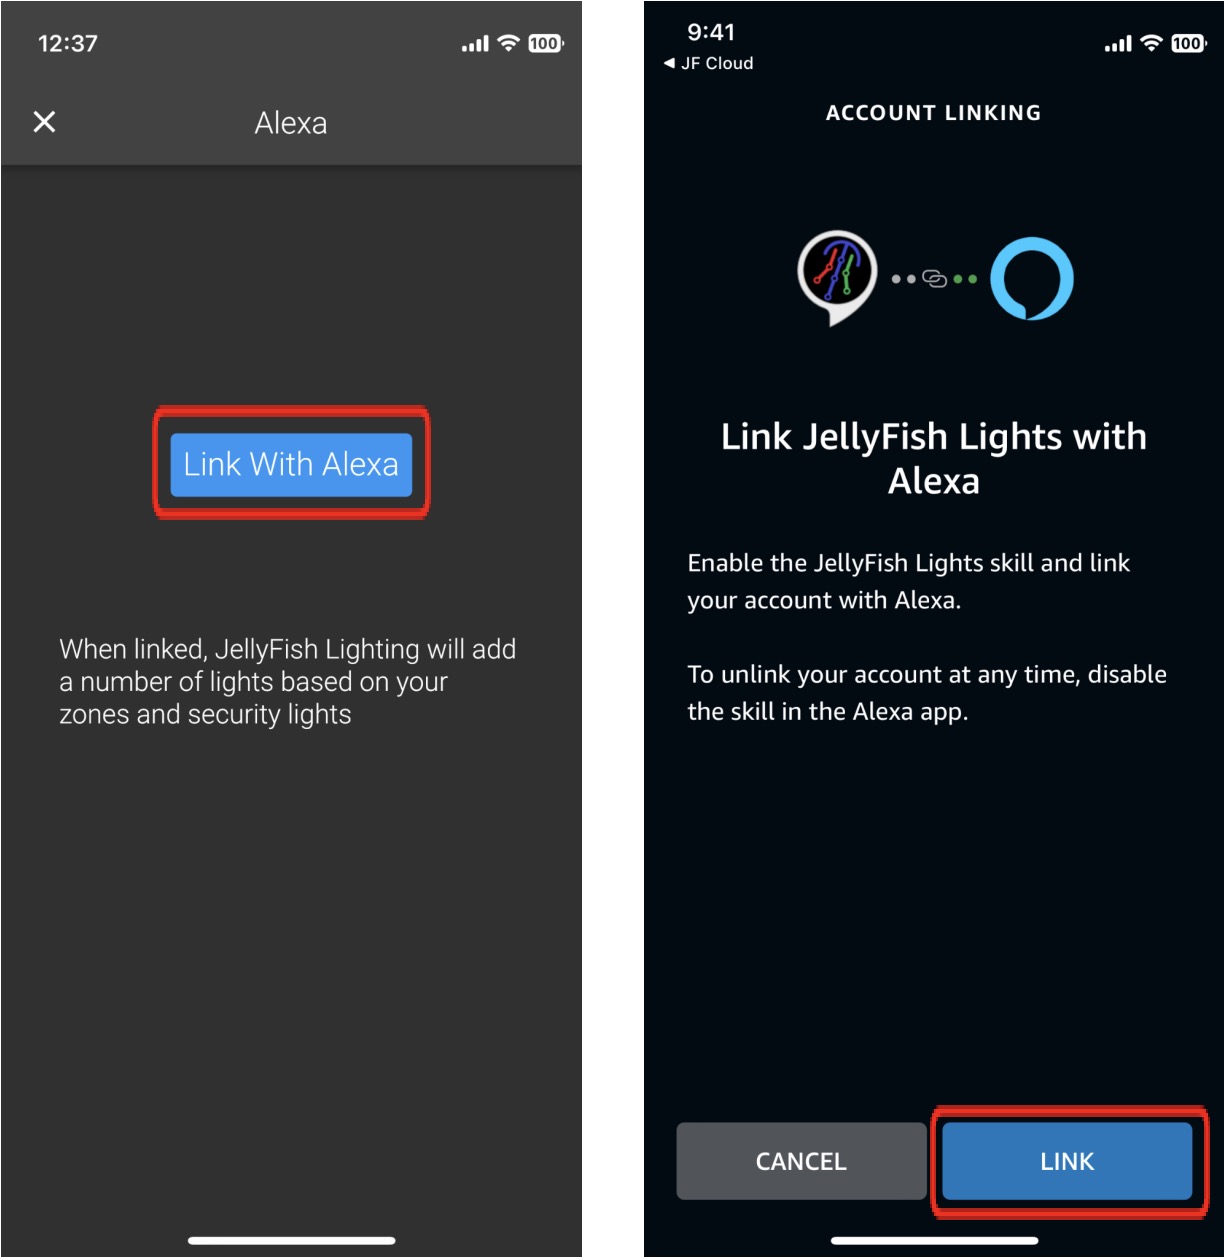
- Press the “Link with Alexa” button
- Follow the prompts to link JellyFish and Alexa
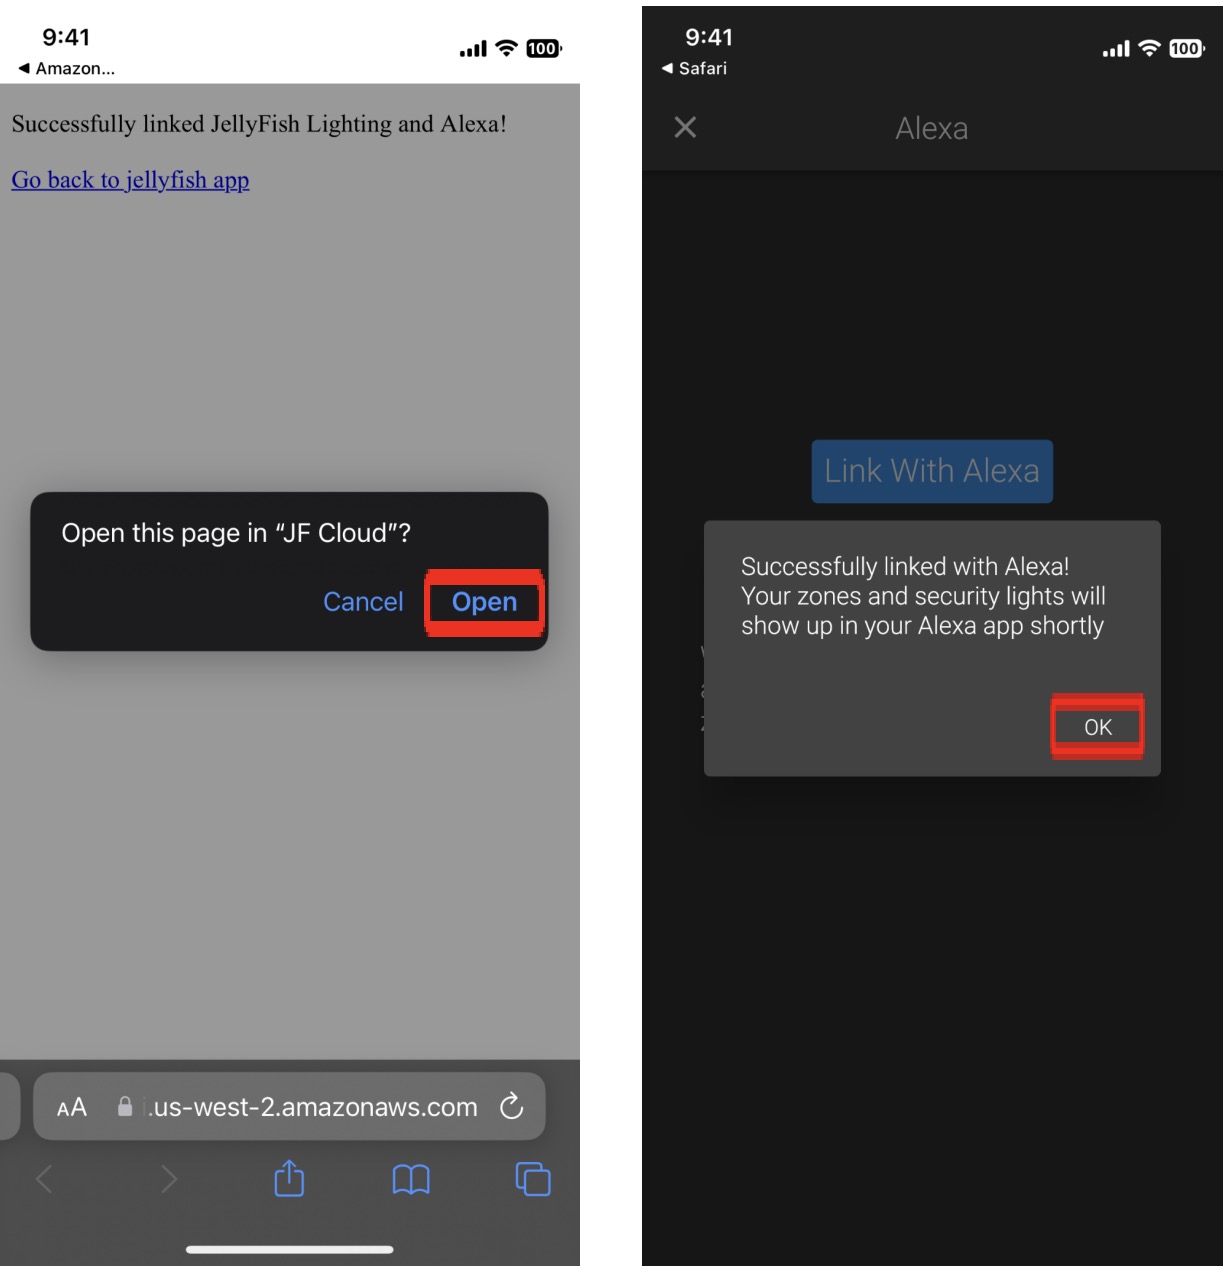
- When completed follow the prompt to return to the JellyFish Cloud App
- If the linking was successful, a notification will be shown in the JellyFish Cloud App
Using Alexa with JellyFish Lights
Devices
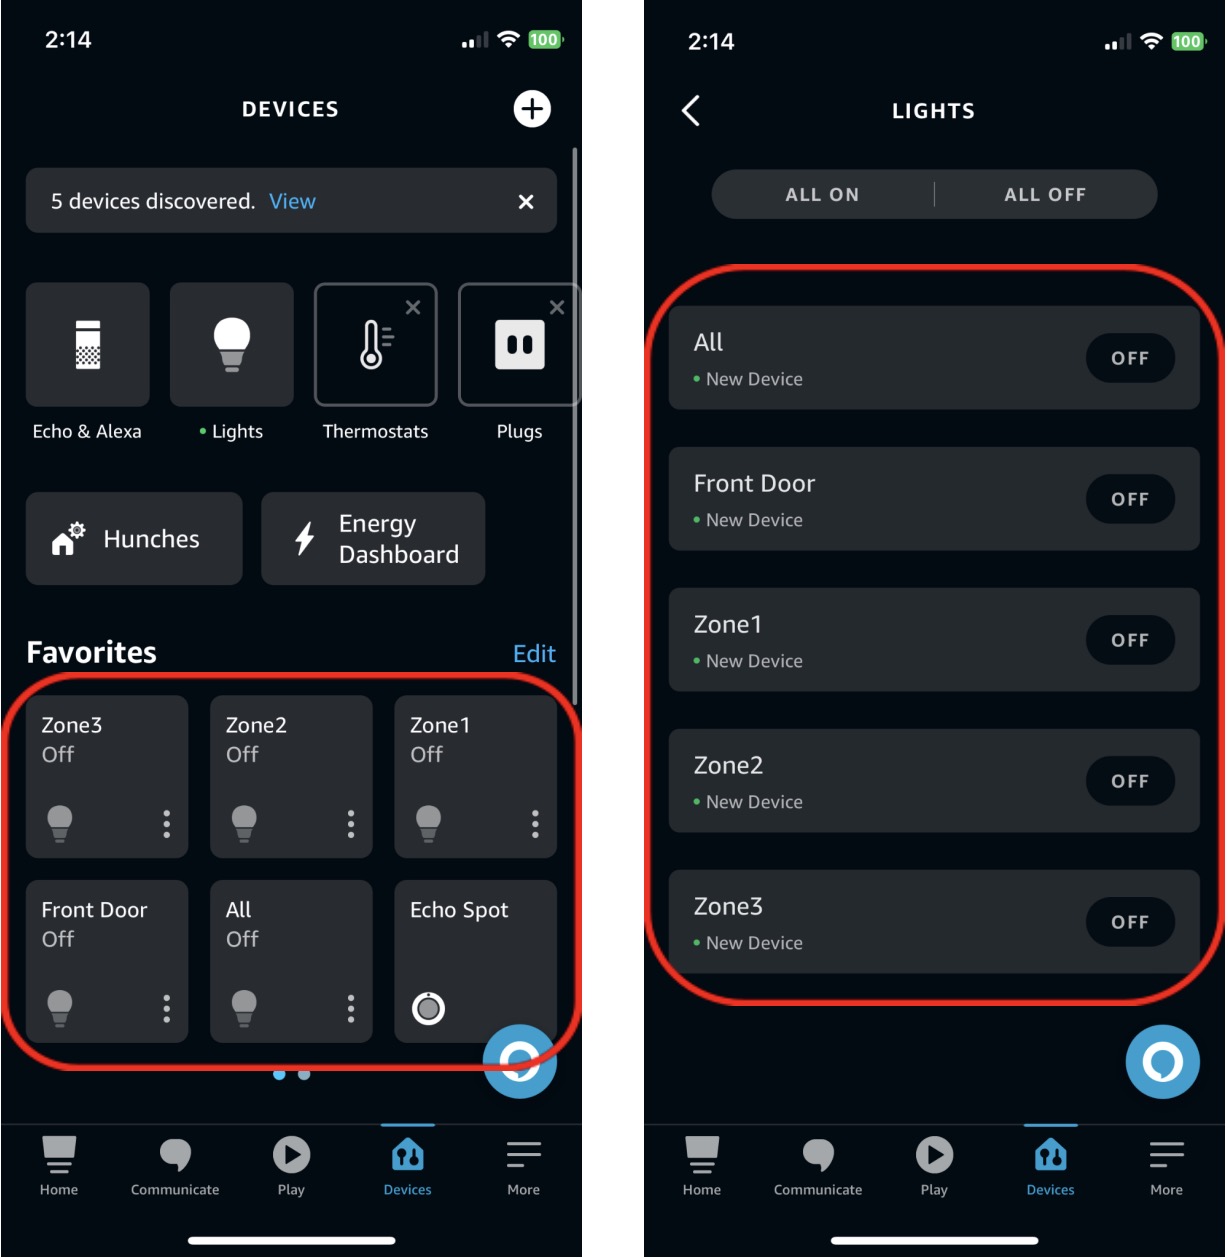
Shortly after linking your JellyFish Lights with Alexa, a number of devices/lights will appear on your Alexa app/account
The devices added are as follows:
- An “All” light that controls all zones from all controllers on your account
- A light for each zone you have, named after the zone
- A light for each security light you have setup, as described later
Commands
There are 2 ways of controlling JellyFish Lights with Alexa:
- Smart Home
or - JellyFish Lights custom skill.
The following sections will contain examples of how to change your lights with each model. Note that these phrases do not have to be repeated exactly to get the same result.
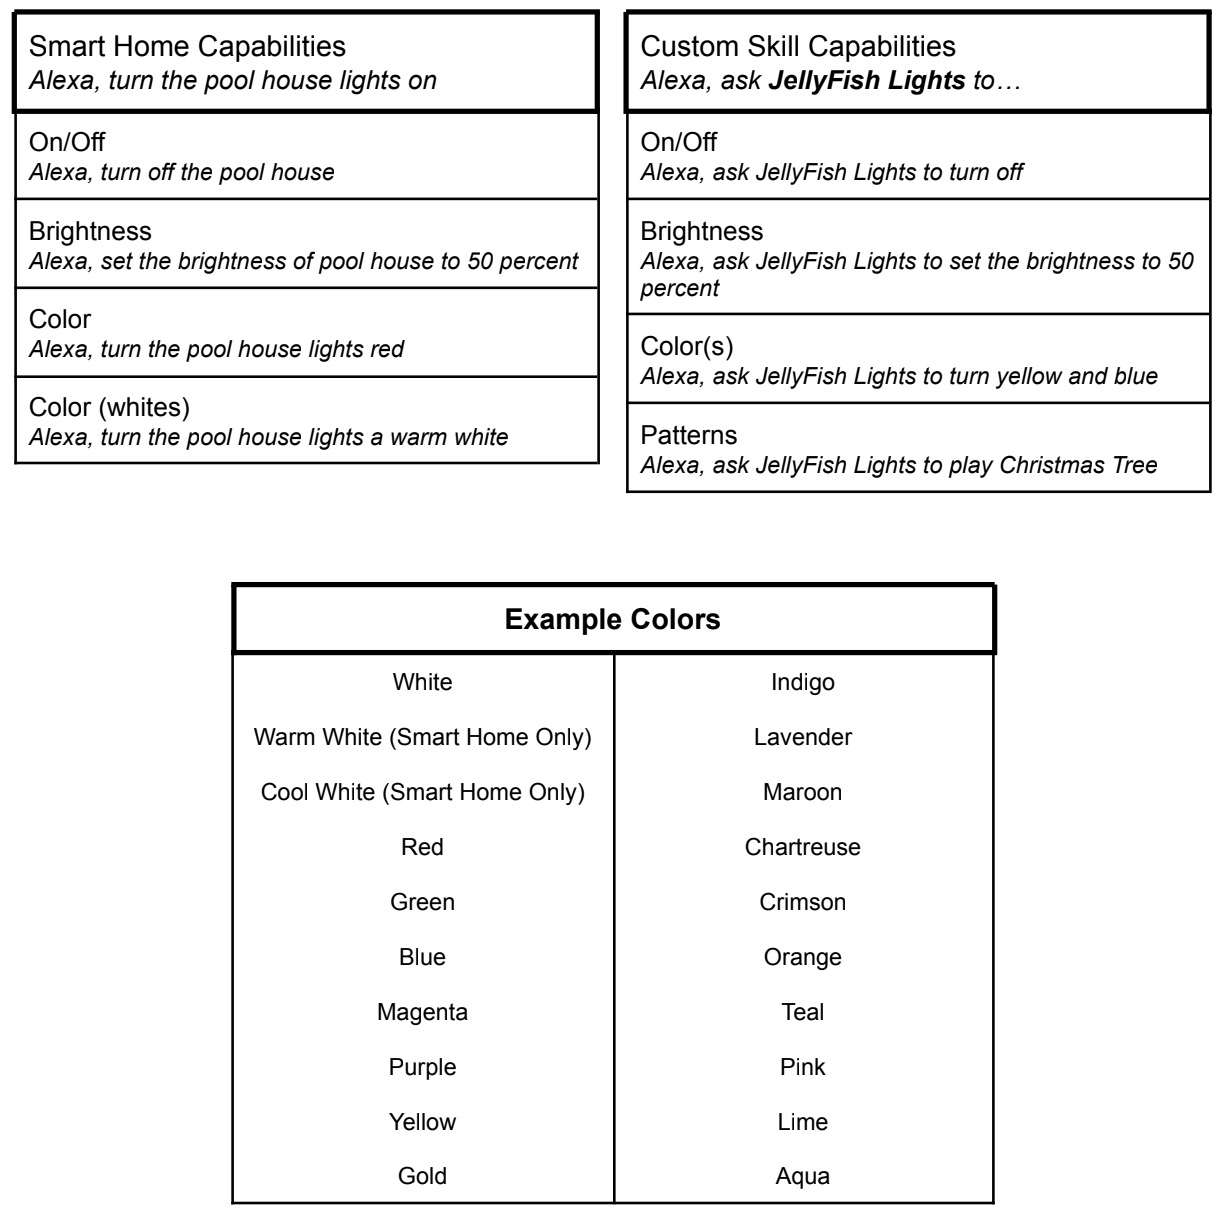
Simple Interacting Using Smart Home
Using the Smart Home method is the simpler but more limited way of interacting with your lights with Alexa.
Smart Home Capabilities are:
- Turn lights on/off,
- Change the brightness,
- Set a single color
Security lights will be explained later on but for now know that they only have on/off capability.
In this example the Zone used is named: Front of House
Turning the lights on and off
- “Alexa turn on Front of house”
- “Alexa turn Front of house off”
Changing the brightness of the lights
- “Alexa, change Front of house lights to 50 percent brightness”
- “Alexa, increase brightness of Front of house lights by 25”
Playing a single color
- “Alexa, set Front of house to warm white”
- “Alexa, turn Front of house blue”
More Complex Interacting with the JellyFish Lights Custom Skill
Less simple but more flexible in what it can do. Interacting with the skill (currently) will change ALL lights at once, not just a single zone.
The wording “Alexa, ask JellyFish Lights to…” is required.
Custom Skill Capabilities are:
- Play patterns saved on your controller,
- turn on single or multiple colors,
- turn the lights on or off,
- change the brightness
Playing saved patterns
- “Alexa, ask JellyFish Lights to play Christmas Tree”
- “Alexa, tell JellyFish Lights to play Spooky”
Playing a single or multiple colors
- “Alexa, ask JellyFish Lights to turn blue”
- “Alexa, ask JellyFish Lights to turn red and blue”
Turning the lights on or off
- “Alexa, ask JellyFish Lights to turn off”
- “Alexa, tell JellyFish Lights to turn the lights on”
Changing brightness
- “Alexa ask JellyFish Lights to set the brightness to 25”
Using JellyFish Security Lights and Alexa
You can define security lights from within the JellyFish Designer Cloud app. Security Lights are a combination of a pattern saved on your controller and a zone(s). Their primary use case is to be a convenient way to combine home security systems that have Alexa integration (such as Ring) with JellyFish Lights. This is done through the Alexa feature of “Routines”. An example is you could set a routine within the Alexa App that turns on a section of lights above your door when someone rings your smart doorbell.
Creating Security Lights
- To create a security light, open the JellyFish Designer Cloud app and go to
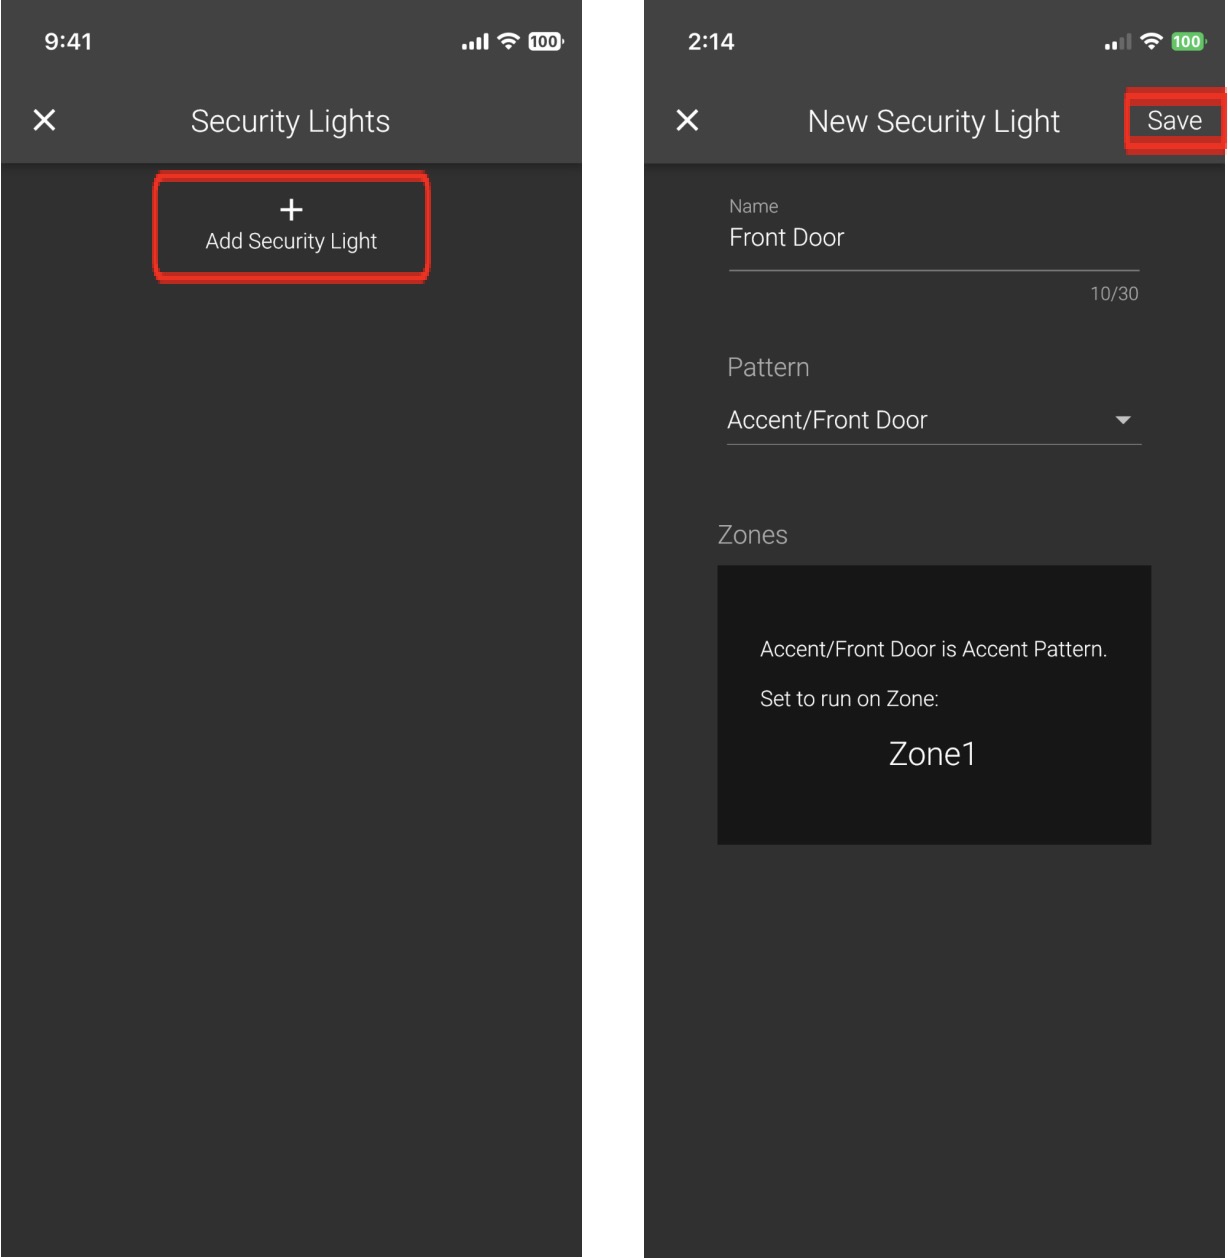
Setup->Smart Home->Security Lights - Then press the “Add Security Light” button
- From there, name your security light and select a pattern to be played and the zone(s) you want it played on
- When you are done, press the “Save” button in the top right corner.
If you have already linked with Alexa, a new device will appear in your app, named the same as the security Light. If you haven’t linked with Alexa, your security light will appear when you do link
Creating a Routine
To get the most out of your security lights, you will want to create routines from within the Alexa app
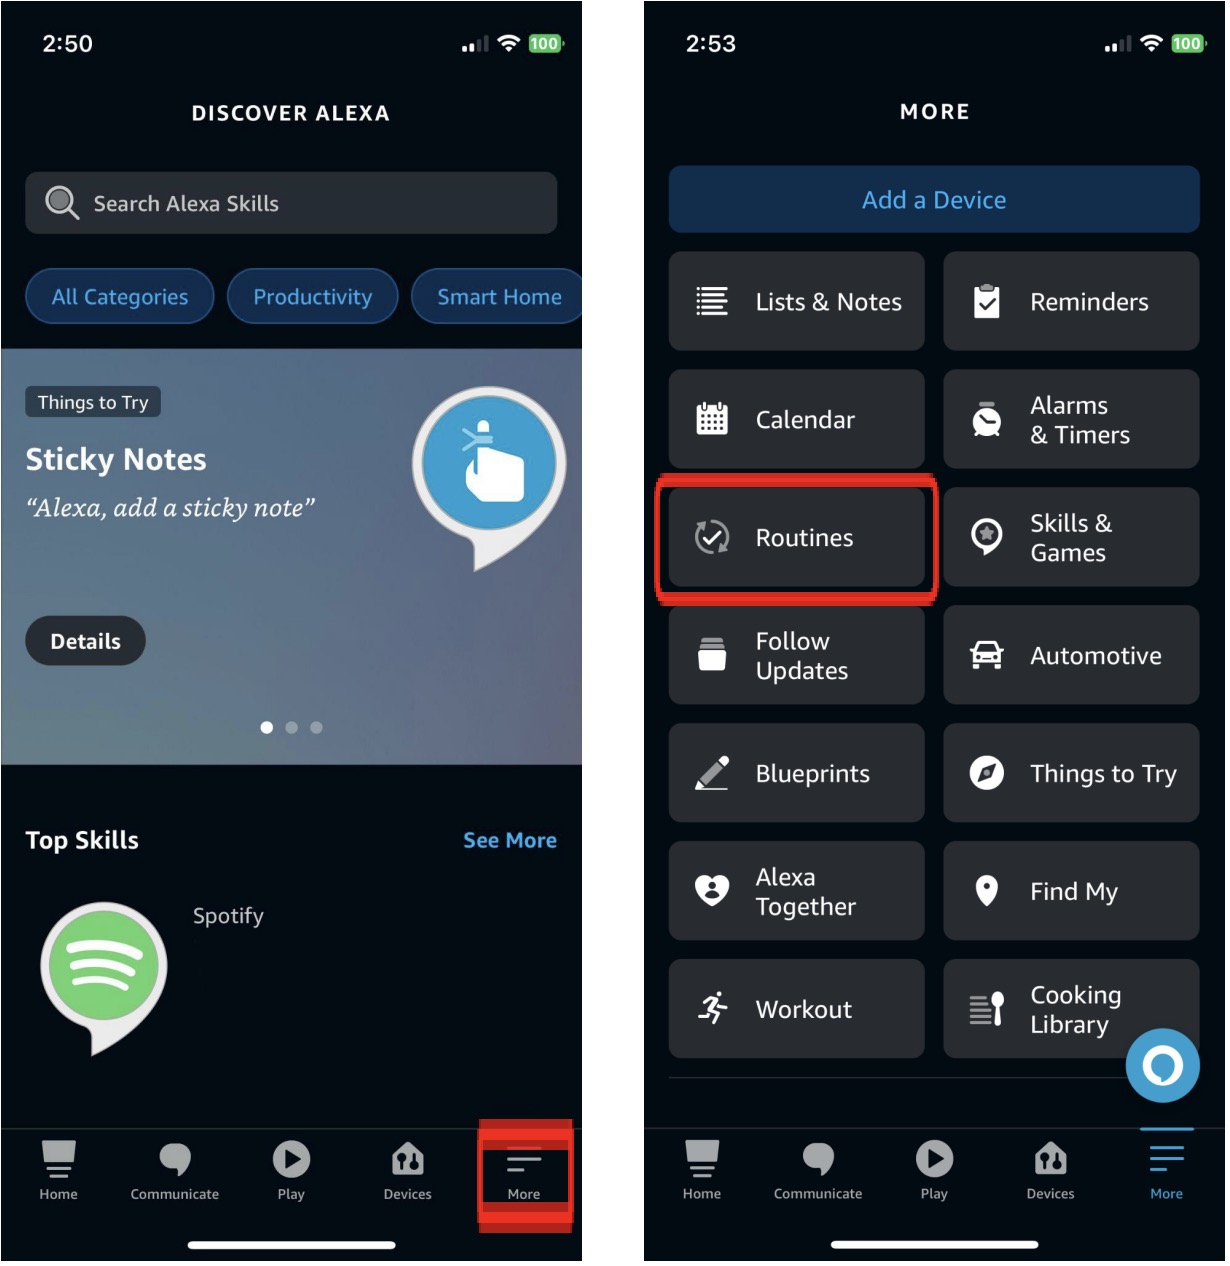
- Open the Amazon Alexa app and go to “More” in the bottom right corner
- Open the “Routines” menu item
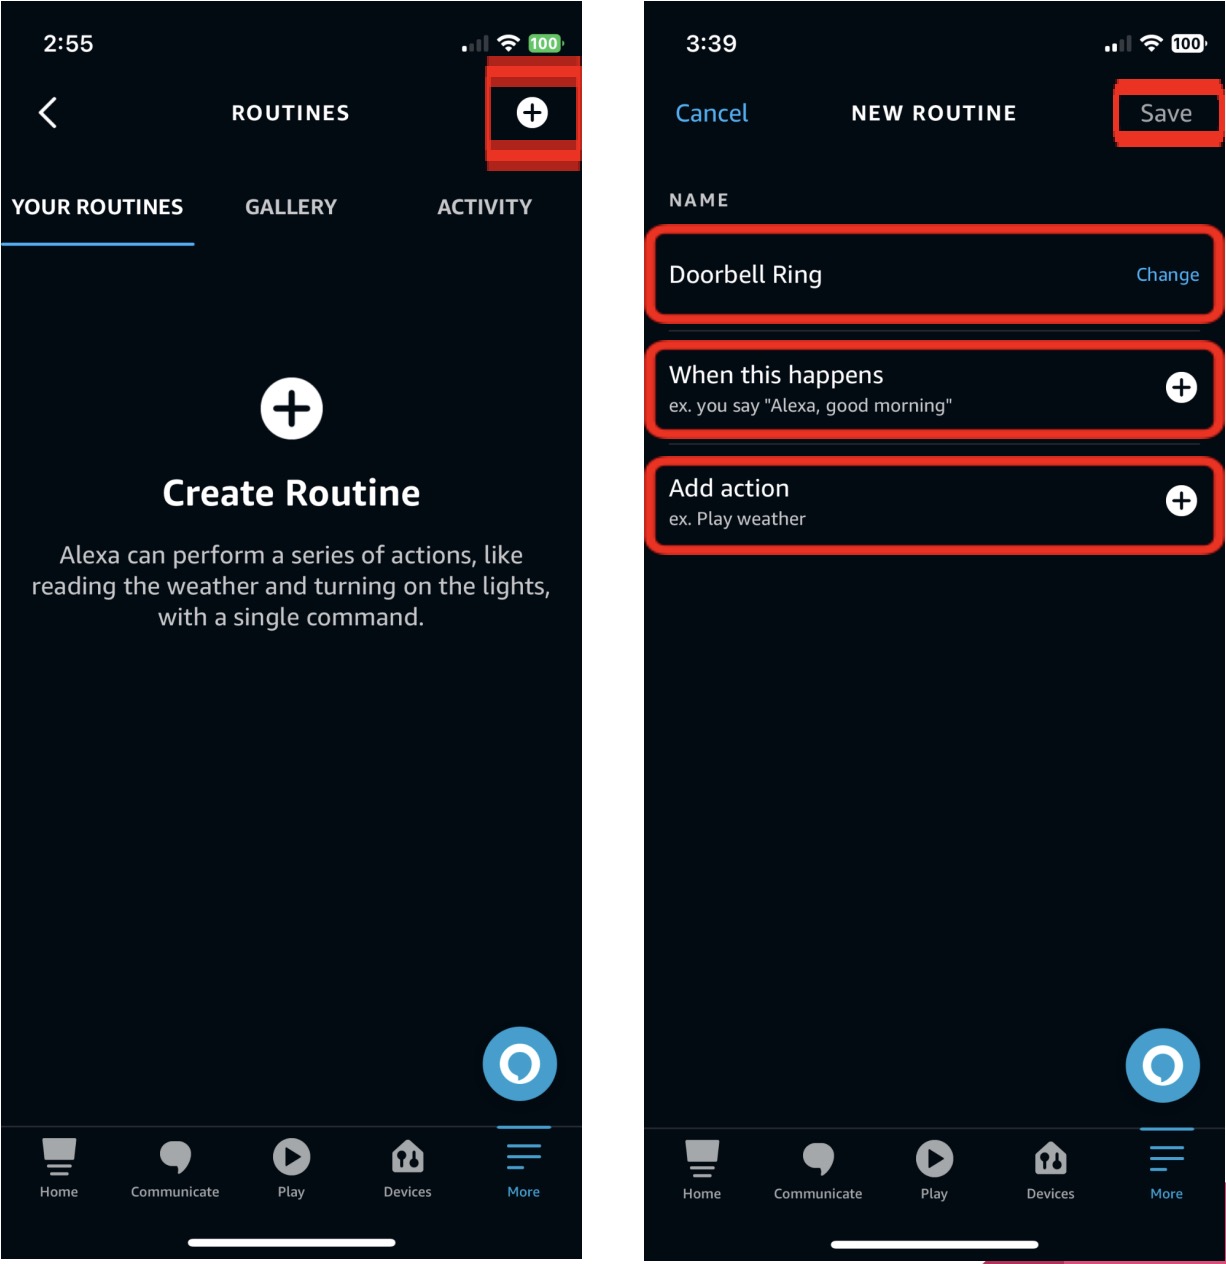
- From the top right corner, click the plus item to start creating your routine
- Give your routine a name, such as “Doorbell ring”, in the “Enter Routine Name” section
- Press the “When this happens” field, and select what you want to trigger your lights on.
- For a device such as a camera, select “Smart Home” and then the device you want.
Note that you may have to do some work on that devices related app to make it work exactly the way you want - Press the “Add Action”, then go to Smart Home to find your JellyFish Lighting security light and set it to turn on
- If you want there to be a delay before the light will turn on again, add another action for Alexa to wait for some amount of time
- Press “Save” in the top right corner
For a full list of Alexa Smart Home Colors see:
https://www.tomsguide.com/us/alexa-color-commands-list,review-4988.html